ICLR 2022: Anomaly Transformer论文阅读笔记(2) 深度解析代码
导读:Anomaly Transformer是一个由Transformer: Attention Is All You Need.启发出的检测时间序列异常点的无监督学习算法。在这一篇我会深度解析论文算法以及代码的一一对应,让人更方便能读懂和使用源代码。.阅读笔记前篇:ICLR 2022
Anomaly Transformer是一个由Transformer: Attention Is All You Need 启发出的检测时间序列异常点的无监督学习算法。在这一篇我会深度解析论文算法以及代码的一一对应,让人更方便能读懂和使用源代码。
阅读笔记前篇:ICLR 2022: Anomaly Transformer论文阅读笔记+代码复现
阅读前提
你应该大致阅读了Anomaly Transformer论文本体(起码Introduction)
你应该下载好了论文代码并安装好了环境。论文源码可以在github上获取:在 https://github.com/thuml/Anomaly-Transformer 处下载,或者直接在需要安装的部分打开cmd,输入
git clone https://github.com/thuml/Anomaly-Transformer.git
关于环境安装和运行中可能遇到的bug,可以参考上一篇文章。
核心概念总结
Transfomer的自注意力机制(self-attention mechanism):一种用于计算序列中每个元素与其他元素之间的相关性的机制,并据此为每个元素分配一个权重。在实际应用中,自注意力可以用于捕捉输入序列内部元素之间的依赖关系和重要性,从而提取序列中的内在结构和语义信息。
作者将Transformers用于时间序列时有以下发现,并引申出两个概念:
- 每个点之间的时序关系可以通过self-attention获得。这个关联分布可以为整个时序上下文提供丰富的描述,展示动态模式,例如周期或趋势,此关联分布被定义为序列关联(series-association), \(\mathcal{S}\):
“The association distribution of each time point can provide a more informative description for the temporal context, indicating dynamic patterns, such as the period or trend of time series. We name the above association distribution as the series-association, which can be discovered from the raw series by Transformers”
- 由于异常点和正常点相比十分稀少,异常点的比较难与整个序列建立关联,但由于连续性,异常点更有可能与其相邻的时间点建立更强关联。这种 adjacent-concentration inductive bias (临近集中传导偏差)被称为先验关联(prior-association),\(\mathcal{P}\):
“The associations of anomalies shall concentrate on the adjacent time points that are more likely to contain similar abnormal patterns due to the continuity. Such an adjacent-concentration inductive bias is referred to as the prior-association.”
作者认为这两者之间的差异可以用于衡量异常点,定义了关联差异(Association Discrepancy),AssDis:
“This leads to a new anomaly criterion for each time point, quantified by the distance between each time point’s prior-association and its series- association, named as Association Discrepancy.”
网络结构和对比:vs Transformers
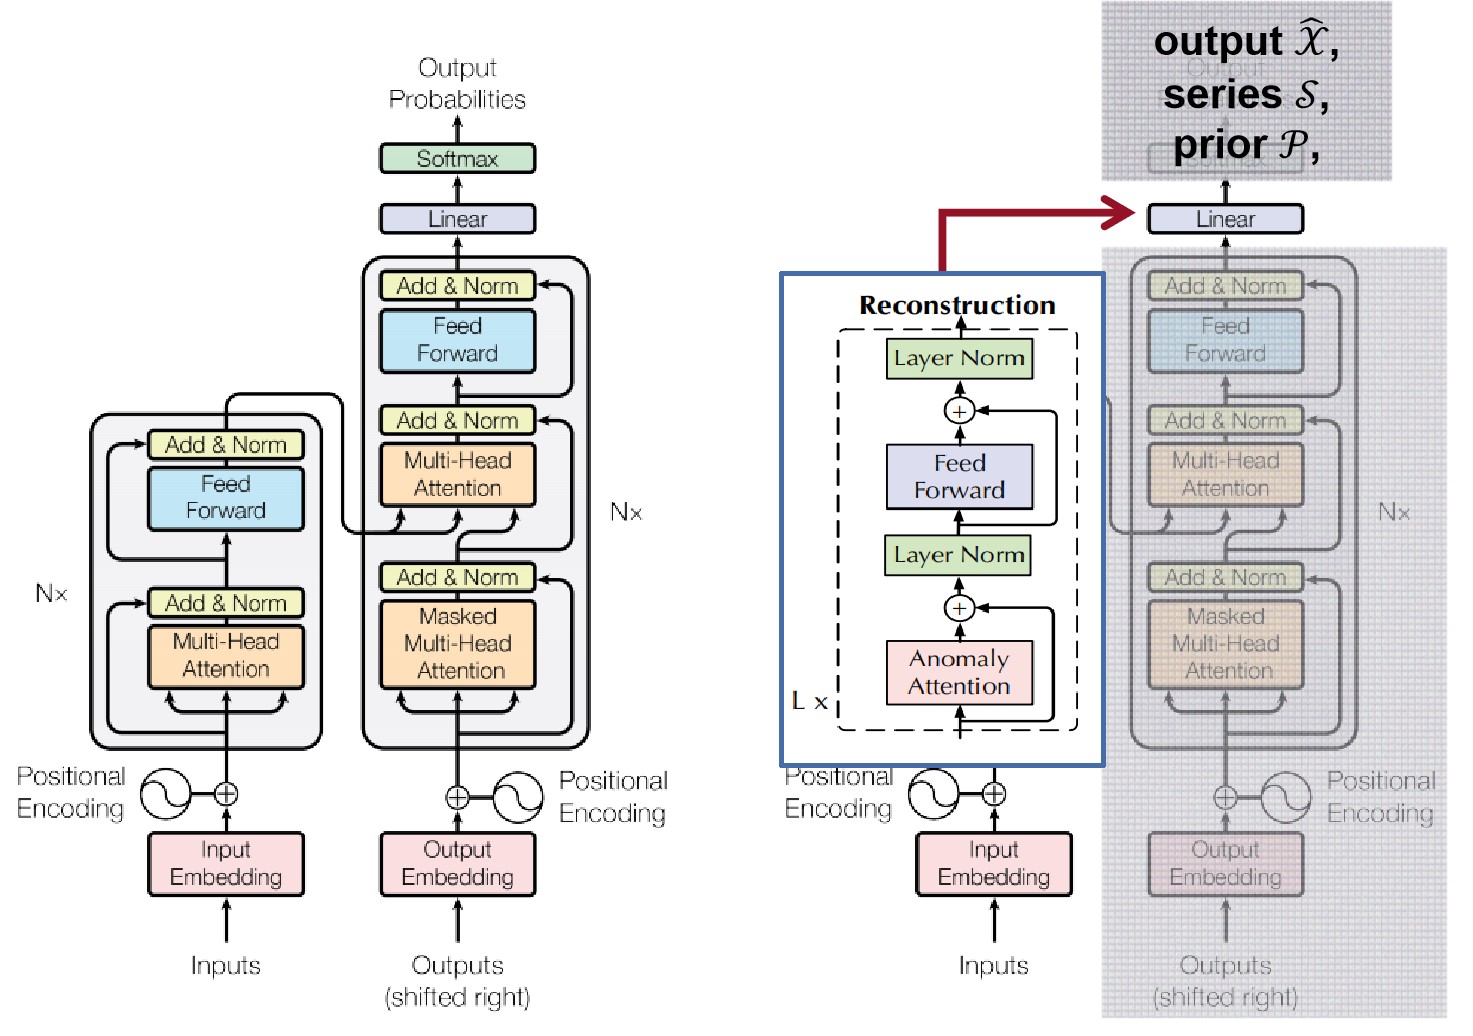
可以参考一下网络结构的对比:

在原本Transformer(左)的基础上,首先因为是非监督学习,去除了decoder的部分;源码中的Input Embedding和Positional Encoding与Transformer的也比较相近。做出较大改动的是encoder的部分,由6层encoder改成了3层,并修改了Attention Layer的构成。输出部分也有更改,从统计概率变成了encode过的output \(\hat{\mathcal{X}}\), series- association \(\mathcal{S}\) 和prior-association \(\mathcal{P}\)。
网络部分/代码对应
Encoder部分: model/AnomalyTransformer.py
这一部分主要阅读 model/AnomalyTransformer.py 。首先 AnomalyTransformer
可以和算法结构图中虚线框起来的encoder部分对应:
class AnomalyTransformer(nn.Module):
    def __init__(self, win_size, enc_in, c_out, d_model=512, n_heads=8, e_layers=3, d_ff=512,
                 dropout=0.0, activation='gelu', output_attention=True):
        super(AnomalyTransformer, self).__init__()
        self.output_attention = output_attention

        # Encoding
        # 与Transformer相近, nn.dropout(Token Embedding(x)+position encoding(x))
        # 这一部分论文没有详尽解释
        self.embedding = DataEmbedding(enc_in, d_model, dropout)

        # Encoder
        self.encoder = Encoder(
            [
                EncoderLayer(
                    AttentionLayer(
                        AnomalyAttention(win_size, False,
                                         attention_dropout=dropout,
                                         output_attention=output_attention),
                        d_model, n_heads),
                    d_model,
                    d_ff,
                    dropout=dropout,
                    activation=activation
                ) for l in range(e_layers)	# 这里为3层encoder layer(虚线部分)
            ],
            norm_layer=torch.nn.LayerNorm(d_model)
        )

        self.projection = nn.Linear(d_model, c_out, bias=True)

    def forward(self, x):
        # 与虚线内对应
        enc_out = self.embedding(x)
        enc_out, series, prior, sigmas = self.encoder(enc_out)
        enc_out = self.projection(enc_out)

        if self.output_attention:
            return enc_out, series, prior, sigmas
        else:
            return enc_out  # [B, L, D]
其中 EncoderLayer 代表了网络结构图中虚线框起来的部分。以下是它的源码:
class EncoderLayer(nn.Module):
    def __init__(self, attention, d_model, d_ff=None, dropout=0.1, activation="relu"):
        super(EncoderLayer, self).__init__()
        d_ff = d_ff or 4 * d_model
        self.attention = attention
        self.conv1 = nn.Conv1d(in_channels=d_model, out_channels=d_ff, kernel_size=1)
        self.conv2 = nn.Conv1d(in_channels=d_ff, out_channels=d_model, kernel_size=1)
        self.norm1 = nn.LayerNorm(d_model)
        self.norm2 = nn.LayerNorm(d_model)
        self.dropout = nn.Dropout(dropout)
        self.activation = F.relu if activation == "relu" else F.gelu
    def forward(self, x, attn_mask=None):
        new_x, attn, mask, sigma = self.attention(
            x, x, x,
            attn_mask=attn_mask
        )
        x = x + self.dropout(new_x)
        y = x = self.norm1(x)
        y = self.dropout(self.activation(self.conv1(y.transpose(-1, 1))))
        y = self.dropout(self.conv2(y).transpose(-1, 1))

        return self.norm2(x + y), attn, mask, sigma
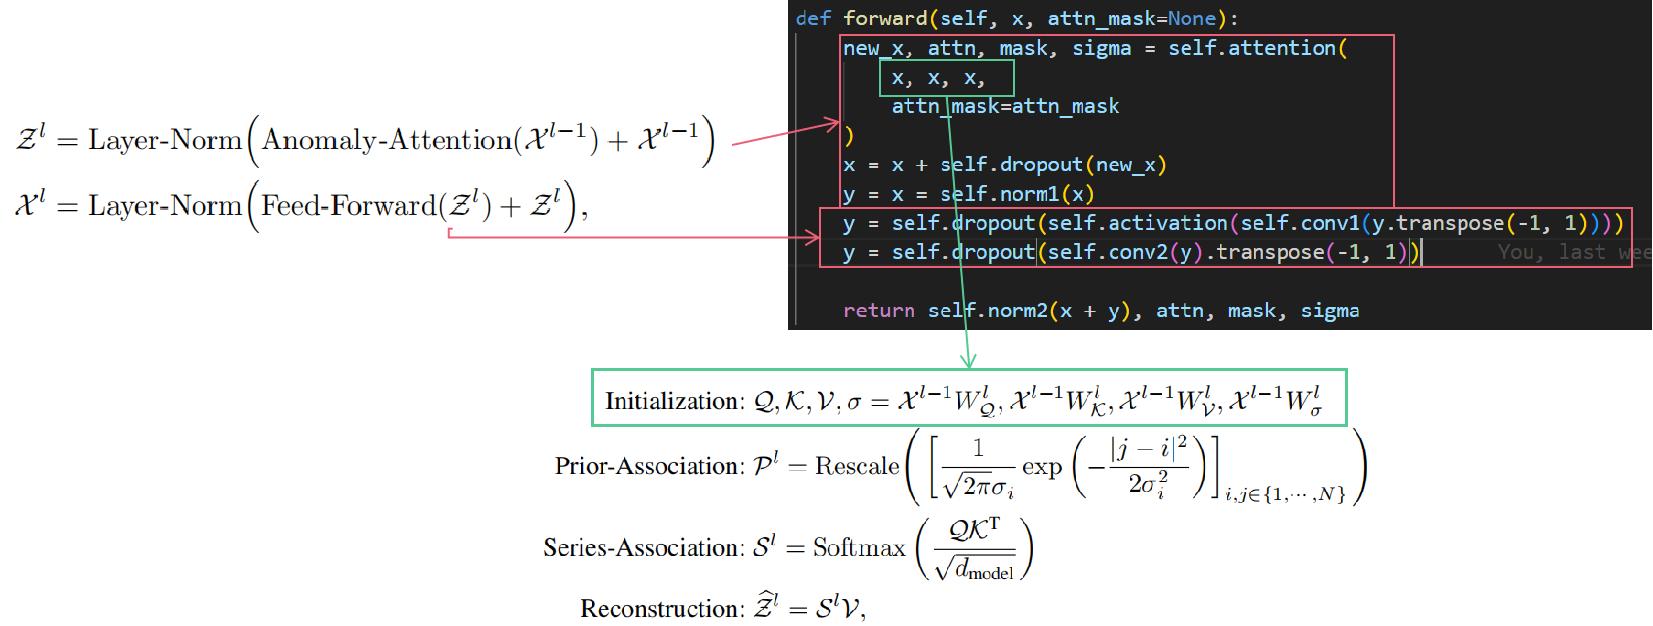
论文中提到的每个第\(l\)层迭代公式与 EncoderLayer 的forward函数对应如下:

其中,self.attention 指的是 AttentionLayer ,这里三个 x 的输入代表了 Anomaly Attention
的初始化。
Anomaly Attention部分: model/attn.py
AttentionLayer 将输入的 \(Q, K, V, \sigma\)从 d_model 投射到多个维度( n_heads
倍原本的维度,这里 n_heads=8 )。最后返回输出时回重新投射回 d_model
class AttentionLayer(nn.Module):
    def __init__(self, attention, d_model, n_heads, d_keys=None,
                 d_values=None):
        super(AttentionLayer, self).__init__()

        d_keys = d_keys or (d_model // n_heads)
        d_values = d_values or (d_model // n_heads)
        self.norm = nn.LayerNorm(d_model)
        self.inner_attention = attention
        # 将Q, K, V, sigma 从d_model投射到多个维度(n_heads倍原本的维度,这里n_heads=8)
        self.query_projection = nn.Linear(d_model,
                                          d_keys * n_heads)
        self.key_projection = nn.Linear(d_model,
                                        d_keys * n_heads)
        self.value_projection = nn.Linear(d_model,
                                          d_values * n_heads)
        self.sigma_projection = nn.Linear(d_model,
                                          n_heads)
        # 将输出投射回d_model维度
        self.out_projection = nn.Linear(d_values * n_heads, d_model)

        self.n_heads = n_heads

    def forward(self, queries, keys, values, attn_mask):
        B, L, _ = queries.shape
        _, S, _ = keys.shape
        H = self.n_heads
        x = queries
        queries = self.query_projection(queries).view(B, L, H, -1)
        keys = self.key_projection(keys).view(B, S, H, -1)
        values = self.value_projection(values).view(B, S, H, -1)
        sigma = self.sigma_projection(x).view(B, L, H)

        # 进行anomaly-attention运算
        out, series, prior, sigma = self.inner_attention(
            queries,
            keys,
            values,
            sigma,
            attn_mask
        )
        out = out.view(B, L, -1)

        return self.out_projection(out), series, prior, sigma
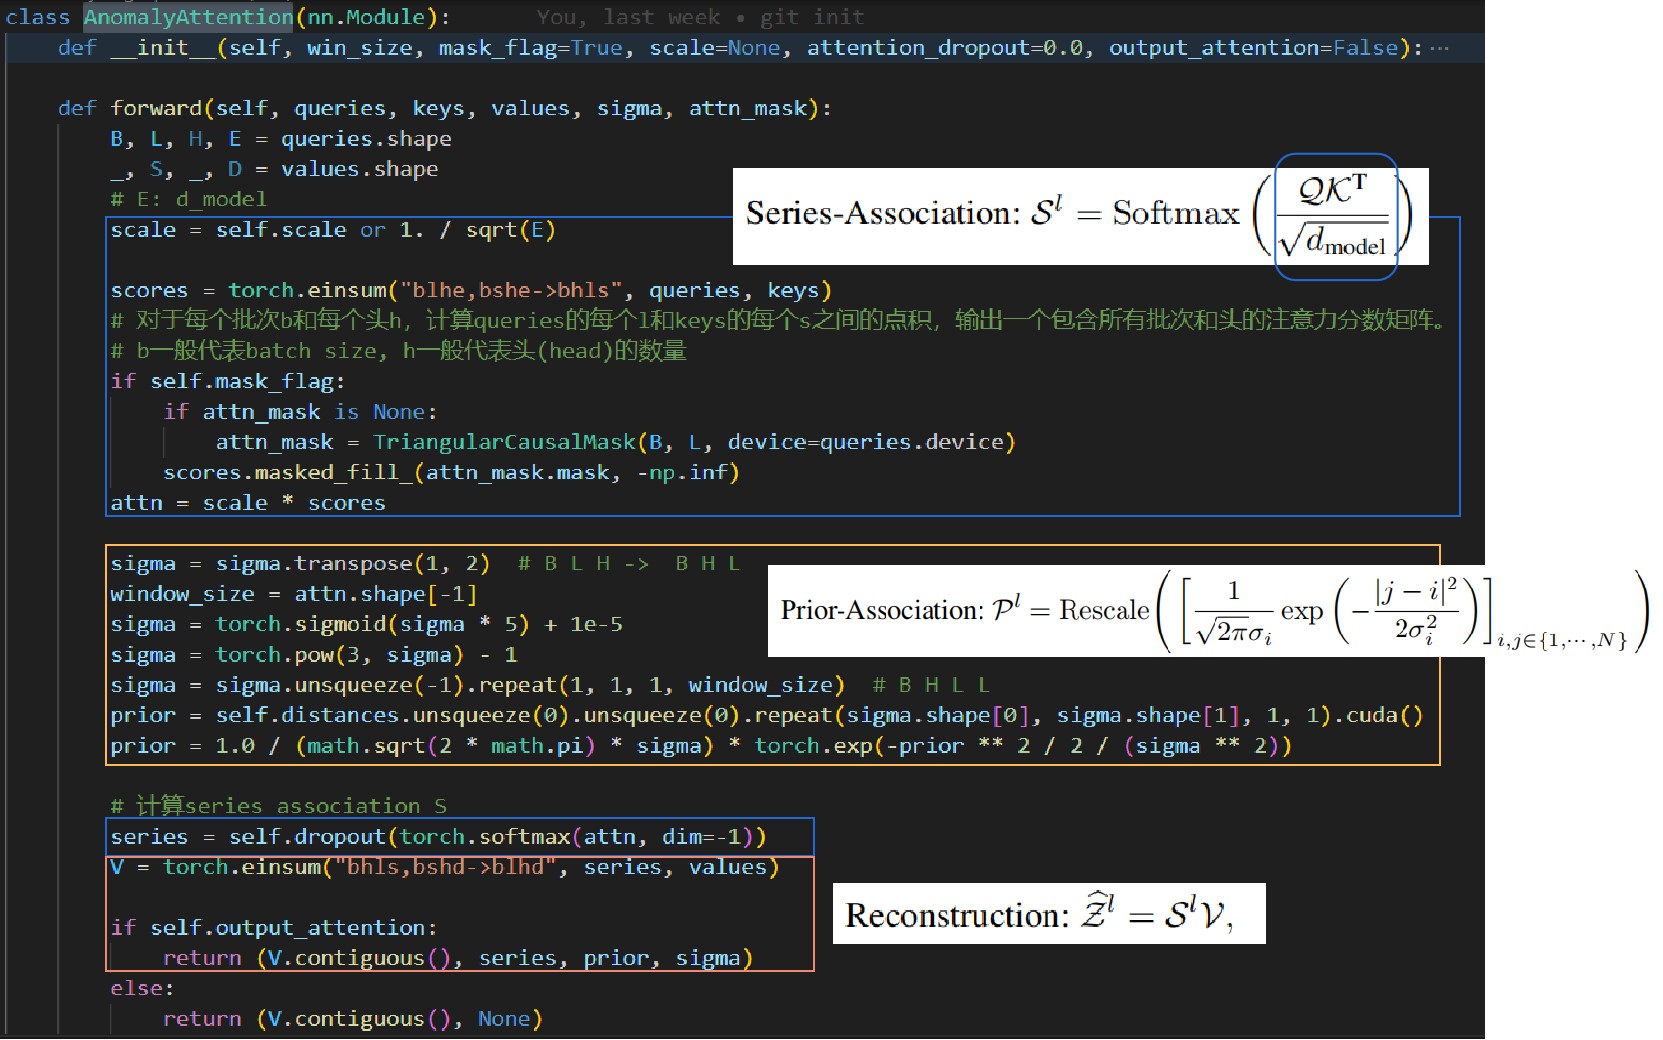
这里的anomaly-attention运算为这一系列公式:
\[\begin{aligned} & \text{Initialization}: \mathcal{Q}, \mathcal{K}, \mathcal{V}, \sigma=\mathcal{X}^{l-1} W{\mathcal{Q}}^l, \mathcal{X}^{l-1} W{\mathcal{K}}^l, \mathcal{X}^{l-1} W{\mathcal{V}}^l, \mathcal{X}^{l-1} W\sigma^l \\ & \text{Prior-Association}: \mathcal{P}^l=\operatorname{Rescale}\left(\left[\frac{1}{\sqrt{2 \pi} \sigma_i} \exp \left(-\frac{|j-i|^2}{2 \sigmai^2}\right)\right]{i, j \in\{1, \cdots, N\}}\right) \\ & \text{Series-Association}: \mathcal{S}^l=\operatorname{Softmax}\left(\frac{\mathcal{Q K}^{\mathrm{T}}}{\sqrt{d_{\text {model }}}}\right) \\ & \text{Reconstruction}: \widehat{\mathcal{Z}}^l=\mathcal{S}^l \mathcal{V} \end{aligned} \]
其中每一部分都可以在 AnomalyAttention 类中被解构:

优化机制与算法对应
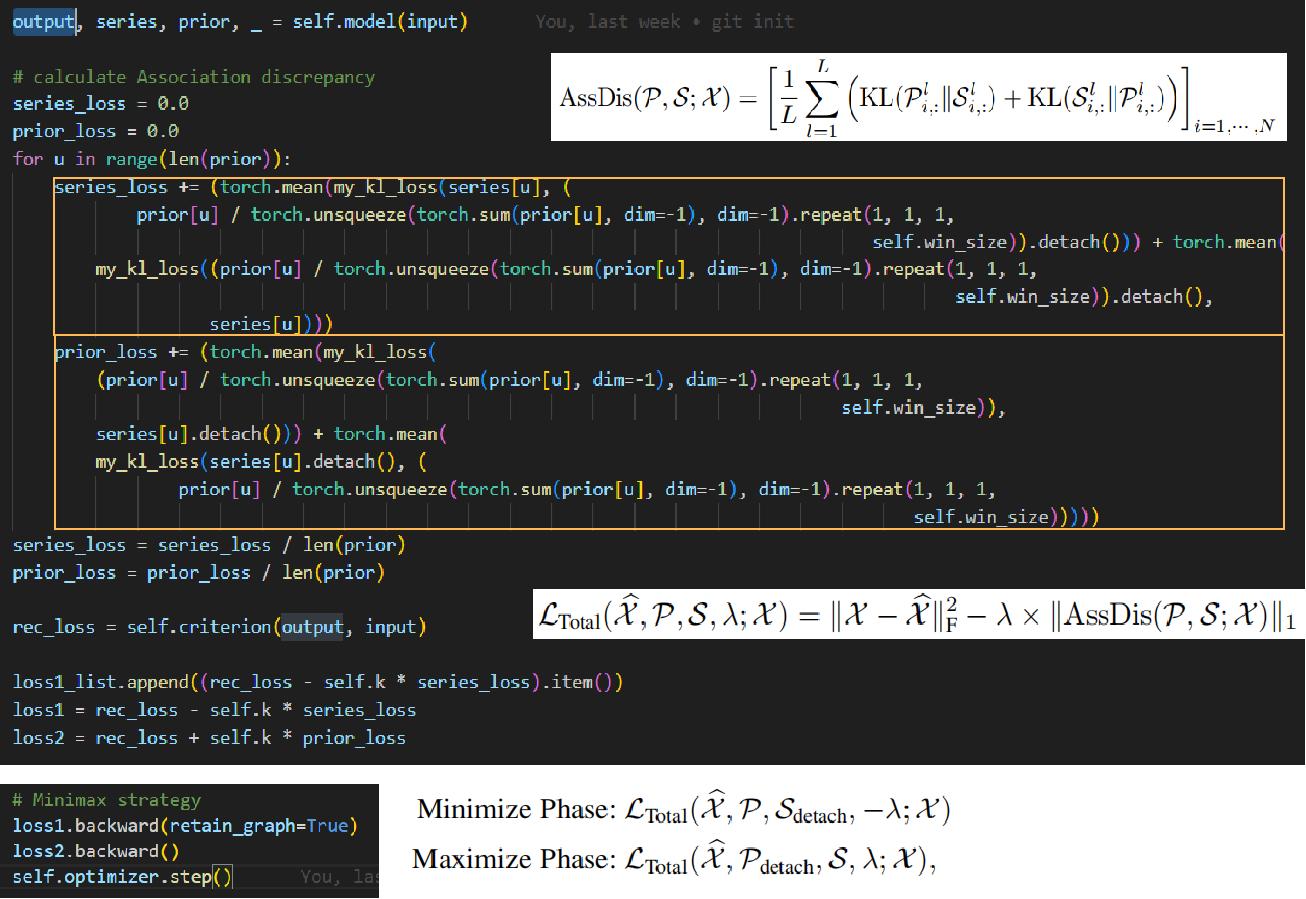
再回到一开始的算法结构图,可以看到输出了output \(\hat{\mathcal{X}}\),series-association \(\mathcal{S}\)和prior-association \(\mathcal{P}\)。其中后两者会被用于计算关联差异AssDis :
\[\operatorname{AssDis}(\mathcal{P}, \mathcal{S} ; \mathcal{X})=\left[\frac{1}{L} \sum{l=1}^L\left(\operatorname{KL}\left(\mathcal{P}{i,:}^l | \mathcal{S}{i,:}^l\right)+\mathrm{KL}\left(\mathcal{S}{i,:}^l | \mathcal{P}{i,:}^l\right)\right)\right]{i=1, \cdots, N} \]
并且\(\hat{\mathcal{X}}\)会被用于计算损失函数:
\[\mathcal{L}{\text {Total }}(\widehat{\mathcal{X}}, \mathcal{P}, \mathcal{S}, \lambda ; \mathcal{X})=|\mathcal{X}-\widehat{\mathcal{X}}|{\mathrm{F}}^2-\lambda \times|\operatorname{AssDis}(\mathcal{P}, \mathcal{S} ; \mathcal{X})|_1 \]
这里第一项是reconstruction loss。
这一部分的计算可以在 solver.py 中定义的 Solver.train() 里找到。因为比较长我会截取一部分:

上图也给出了minimax的优化策略。由于直接最大化关联差异会导致高斯核的\(\lambda\)参数急速减小,先序序列会变得无意义,因此作者使用了这样的minimax策略进行参考:

注意这里的 .detach()
方法主要是用于让该Tensor不再参与反向传播,即不会在模型中被更新,减少计算量和内存。我的理解是,第一步minimize
phase当\(\lambda\)为负时,减小\(\mathcal{L}\)为减小\(\mathcal{P}\)和\(\mathcal{S}\)之间的距离(\(\operatorname{AssDis}(\mathcal{P},
\mathcal{S} ;
\mathcal{X})\)),通过固定\(\mathcal{S}\),只更新\(\mathcal{P}\)的梯度,使\(\mathcal{P}\)在prior高斯分布范围内更接近\(\mathcal{S}\);第二步maximize
phase我们固定\(\mathcal{P}\),使\(\lambda\)为正,优化中会拉大\(\mathcal{P}\)和\(\mathcal{S}\)之间的距离。可以参考上图最右边的series-
association变得更平滑,单峰更不明显,实际它的分布与prior-association之间的距离更大了。
上一篇:何时使用GraphQL、gRPC
下一篇:MFAN论文阅读笔记(待复现)


